How to Configure Mikrotik Router Access Point Settings
The Mikrotik Router Access Point Settings plays a crucial role in creating a seamless and secure Wi-Fi network. In this article, we will explore how to configure a password-protected wireless access point (WAP) on a Mikrotik Wi-Fi router using the WinBox/WinFig or from the command line over SSH.
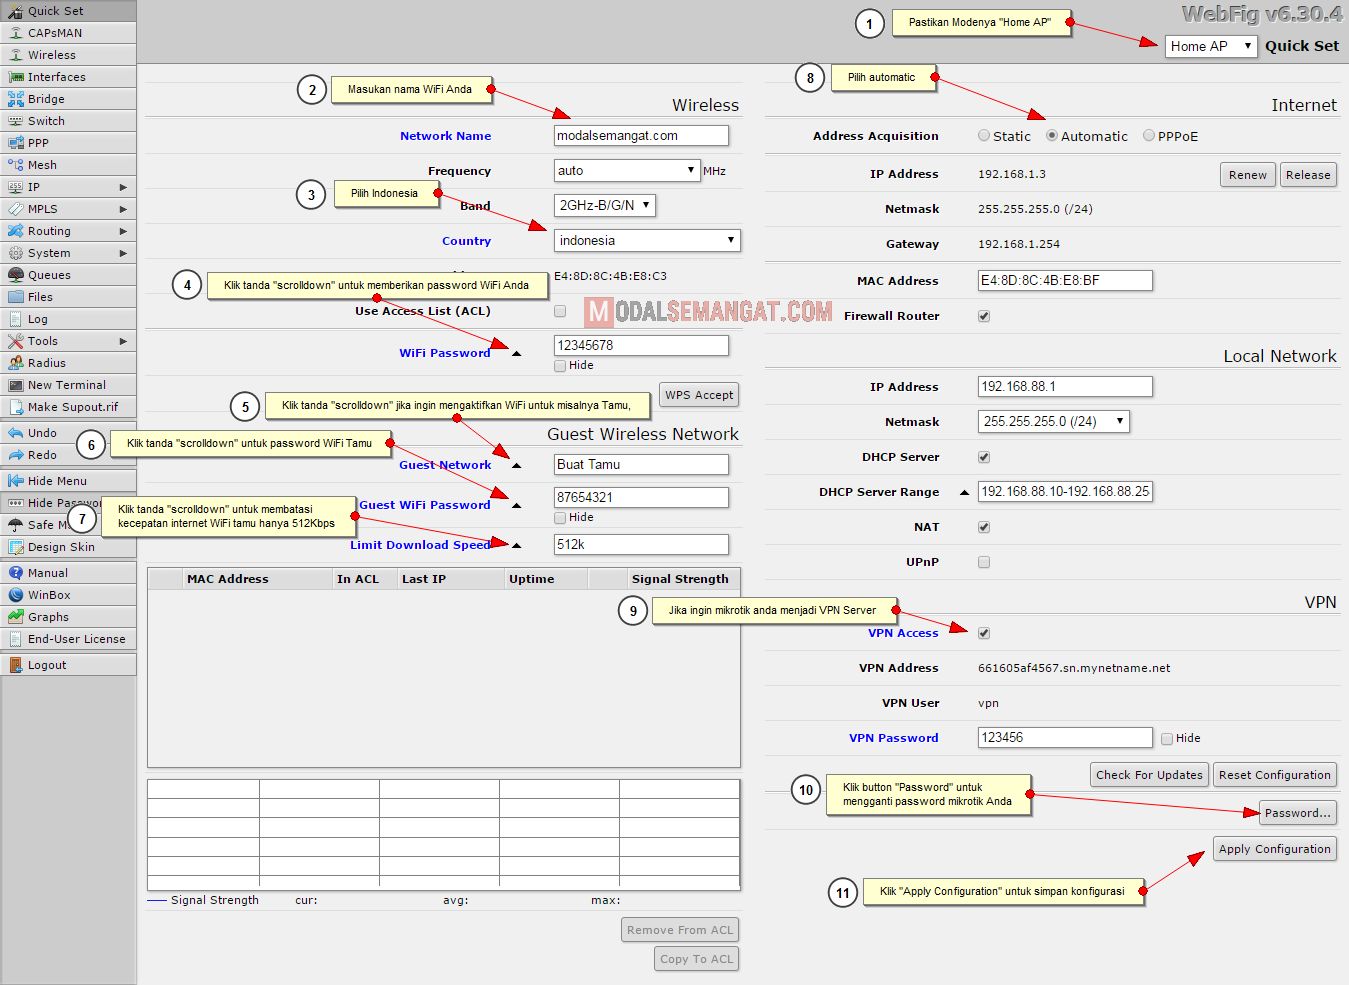
Configure Mikrotik Router as Access Point
First, let's log in to the Mikrotik router using the WinBox/WinFig. Click on the "IP" tab and then click on the " address" drop-down menu. Select "Add Address" and enter the IP address of the Mikrotik router. The default IP address is 192.168.88.1. Click on the "Apply" button to save the changes.
Next, navigate to the "Wireless" tab and select the wireless interface (for example, "wlan1") and change the "Mode" to "AP," which stands for Access Point. This will configure the wireless interface to act as an access point.
Set SSID and Security Settings
Now, let's set the SSID (network name) and security settings for the access point. Click on the "Wireless" tab and select the wireless interface (for example, "wlan1"). In the "Basic" section, click on the "SSID" field and enter a unique SSID for your network.
Next, navigate to the "Security" section and select the authentication type as "WPA2 PSK" or "WPA-PSK (AES)." Then, enter a strong password for your wireless network and click on the "Apply" button to save the changes.
Configure Bridge Mode
By default, the Mikrotik router is in bridge mode, which means it acts as a bridge between the wired and wireless networks. To configure the bridge mode, navigate to the "Bridge" tab and select the "bridge" interface (for example, "bridge1").
Click on the "Add" button and select the interface to add; for example, the wireless interface (wlan1). This will configure the interface as a bridge. Make sure to select the "VLAN" option and assign a VLAN ID to the interface.
Advanced Settings
For advanced users, the Mikrotik router offers various settings to customize the access point. Some of these settings include:
- MTD: This stands for Multi-User Detection, which helps to distribute the load of wireless clients across multiple channels.
- TX Power: This setting allows you to adjust the transmit power of the wireless interface.
- TX Rate: This setting allows you to adjust the transmission rate of the wireless interface.
- Link fires: This setting allows you to configure multiple wireless networks on a single interface.
These are some of the key settings you need to configure to set up a Mikrotik router as an access point. By following these steps, you can create a seamless and secure Wi-Fi network for your home or office.
Benefits of Using a Mikrotik Router as Access Point
Using a Mikrotik router as an access point offers several benefits, including:
- Improved Wi-Fi Performance: The Mikrotik router offers high-performance Wi-Fi with faster data transfer rates.
- Increased Security: The Mikrotik router supports WPA2 PSK and WPA-PSK (AES) security protocols, ensuring a secure and encrypted connection.
- Easy Configuration: The Mikrotik router is easy to configure and manage, even for non-technical users.
By following these steps, you can set up a Mikrotik router as an access point and enjoy a seamless and secure Wi-Fi experience.
Conclusion
In conclusion, setting up a Mikrotik router as an access point is a straightforward process that requires some technical knowledge. By following the steps outlined in this article, you can create a seamless and secure Wi-Fi network for your home or office. The Mikrotik router offers high-performance Wi-Fi, increased security, and easy configuration, making it an ideal choice for both home and business use cases.


 on MikroTik Router")


