How to Connect 6G Router: A Comprehensive Guide
The sixth generation of wireless technology, or 6G, is the latest innovation in the field of wireless communication. With the increasing demand for faster and more reliable internet connectivity, 6G routers are emerging as a crucial component in meeting the needs of modern users. In this article, we will explore the world of 6G routers and provide a step-by-step guide on how to connect one.
What is a 6G Router?
A 6G router is a device that supports the latest 6G wireless standard, providing faster speeds, lower latency, and greater connectivity than its predecessors. The 6G standard is built on the foundation of 5G and Wi-Fi 6E and offers significant improvements in terms of speed, capacity, and latency. To connect to a 6G router, you need to have a device that supports the 6G standard, such as a laptop, smartphone, or tablet.
System Requirements
- Device:** Ensure that your device supports the 6G standard. Check with your device manufacturer to confirm compatibility.
- Router:** You need a 6G router that supports the 6G standard. Check your router's documentation or contact the manufacturer to confirm compatibility.
- Internet Service Provider (ISP):** Verify that your ISP supports 6G connectivity. Not all ISPs offer 6G services, so be sure to check with your provider before purchasing a 6G router.
How to Connect a 6G Router
Connecting a 6G router is a relatively straightforward process. Here's a step-by-step guide:
Step 1: Physical Installation
Unbox your 6G router and connect it to a power source. Place the router in a central location in your home or office to ensure optimal coverage.
Step 2: Configure Router Settings
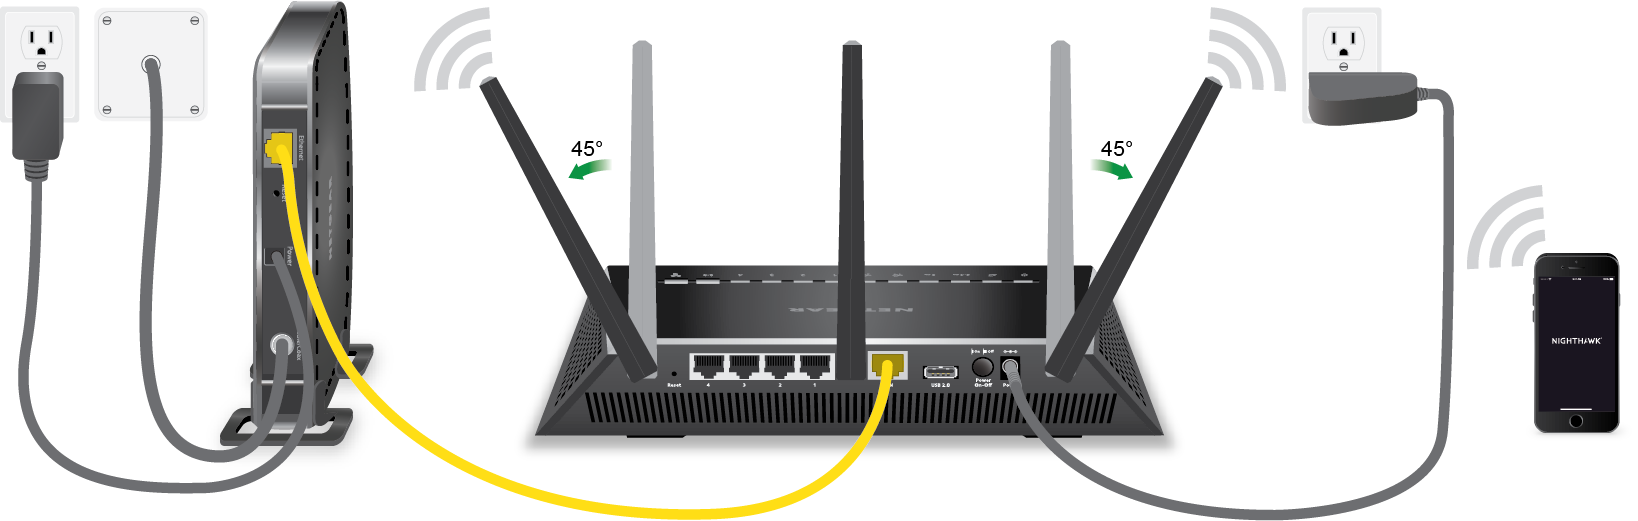
Access your router's web interface by opening a web browser and typing the router's IP address. The default IP address is usually 192.168.0.1 or 192.168.1.1. You can find it in your router's documentation or contact the manufacturer for assistance.
Step 3: Enable 6G Frequency Band
Navigate to the wireless settings section of your router and enable the 6G frequency band. This is usually done by selecting the 6GHz option in the wireless settings menu.
Step 4: Connect to the 6G Network
Once you've enabled the 6G frequency band, you can connect your device to the router using the 6G network. This is usually done by selecting the 6G network from your device's Wi-Fi settings.
Troubleshooting Tips
If you're experiencing issues connecting to your 6G router, here are some troubleshooting tips to help you resolve the problem:
- Verify device compatibility:** Ensure that your device supports the 6G standard and is configured correctly.
- Check router settings:** Verify that the 6G frequency band is enabled in your router's settings.
- Restart the router:** Sometimes, a simple reboot can resolve connectivity issues.
- Update router software:** Ensure that your router's firmware is up-to-date. Check with the manufacturer for any updates.
Conclusion
Connecting a 6G router is a straightforward process that requires some basic setup and configuration. By following the steps outlined in this article, you can enjoy the benefits of faster speeds, lower latency, and greater connectivity offered by 6G technology. Remember to check your device and router compatibility, and troubleshoot any issues that may arise. With a 6G router, you can unlock a faster and more reliable internet experience.


 Self-Install Kit")


![[Wireless Router] How do I enter my ASUS router's setting page using ...](https://appinventiv.com/wp-content/uploads/2024/04/Unlocking-the-Potential-of-6G-How-Ultra-Fast-Connectivity-Will-Drive-Business-Innovation-03-1.webp "[Wireless Router] How do I enter my ASUS router's setting page using ...")


