Comprehensive Beginner's Guide to Ceiling Fan Installation Instructions
Installing a ceiling fan is a great way to upgrade your home's look, improve air circulation, and lower your energy bill. However, the process can be intimidating, especially for those who are new to DIY projects. In this comprehensive guide, we will walk you through the step-by-step ceiling fan installation instructions, ensuring that you can complete the task safely and efficiently.
Before You Begin: Safety Precautions
- Turn Off the Power: Always shut off the power at the breaker before starting the installation process. Use a multimeter to double-check that the wires you'll be working on are de-energized.
- Read and Save These Instructions: Before beginning the installation of your new ceiling fan, read and follow the safety precautions provided in the manufacturer's installation guide.
- Use Proper Tools and Materials: Make sure you have all the necessary tools and materials listed in the manufacturer's instructions, including a screwdriver, wire cutters, and a ladder.
Step 1: Remove the Old Light Fixture
Start by turning off the power and removing any glass shades or light bulbs from the old fixture. Use a screwdriver to release the mounting bracket and gently pull the fixture away from the ceiling.
Step 2: Mount the New Ceiling Fan Bracket
- Align the Bracket: Position the new bracket on the ceiling, ensuring it's centered and securely fastened with screws or clamps.
- Check Security: Double-check that the bracket is securely fastened to prevent any accidental falls during installation.
Step 3: Assemble the Ceiling Fan
Take the new ceiling fan and attach the blades securely to the motor housing. Make sure the blades are evenly spaced and the screws are tightened firmly.
Step 4: Hang the Ceiling Fan
- Attach the Downrod: Attach the downrod to the bracket, following the manufacturer's instructions for the correct lengths and fastening procedures.
- Secure the Fan: Gently pull the fan down into place, ensuring it's securely fastened to the bracket and the downrod is securely attached.
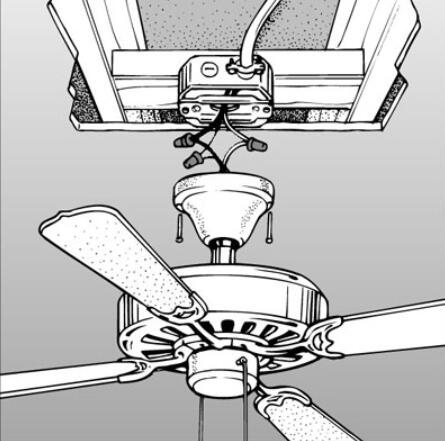
Step 5: Connect the Wires
Connect the wires from the ceiling fan to the electrical wires in the ceiling. Make sure to match the wire color codes to ensure proper connections.
Step 6: Test and Balance the Ceiling Fan
Turn the power back on and test the ceiling fan to ensure it's working properly. Check the fan's balance and adjust the screws or weights as needed to achieve smooth operation.
Additional Tips and Considerations
- Use a Level: Ensure the ceiling fan is level and securely fastened to the bracket and the downrod.
- Check Mounting Brackets: Verify that the mounting brackets are securely attached to the ceiling and the fan is properly supported.
- Consult Manufacturer's Instructions: Refer to the manufacturer's instructions for specific installation requirements and precautions.
Conclusion
Installing a ceiling fan may seem like a daunting task, but with the right guidance and precautions, it can be a relatively simple and rewarding DIY project. Remember to read and follow the manufacturer's installation guide, use proper tools and materials, and take necessary safety precautions to ensure a successful installation. Happy installing!
Additional Resources for Ceiling Fan Installation Instructions
- For maximum performance and minimum noise, the best location to install your in-line duct fan is 6 to 10 feet from the register that needs the boosted air.
- Shop the Hunter Fan Company for a wide variety of styles and features!
When selecting a ceiling fan, it's essential to consider factors like energy efficiency, airflow, and noise level. For more information on ceiling fan installation, consult the manufacturer's instructions, manufacturer's websites, or search online for specific tutorials and resources.


 | Family Handyman")


