Step-by-Step G Wireless Router Setup Guide
Are you looking to setup a wireless router at home or in your office? Setting up a wireless router can be a daunting task, but with the right guide, you can have a strong and secure wireless network up and running in no time. In this comprehensive guide, we will take you through the step-by-step process of setting up a G wireless router, from unboxing to complete setup.
Pre-Setup Checklist
Before you start setting up your G wireless router, make sure you have the following:
- A G wireless router (check the manual and packaging materials to ensure it's a G wireless router)
- A broadband modem (to connect your router to the internet)
- A power source for your router
- A computer or device with a web browser (to access the router's web interface)
- A working internet service provider (ISP) account
Unboxing and Physical Setup
Before you begin the setup process, carefully unbox your G wireless router and all its accompanying parts. Locate the following items:
- The main unit of the wireless router
- The power adapter
- The Ethernet cable
- The user manual
Locate the suggested placement area for your wireless router, which is typically in a central location to provide equal coverage to all areas of your home or office. Connect the power adapter to the main unit and plug it into a power outlet.
Initial Configuration
Open a web browser on your computer or device and access the router's web interface by typing the router's IP address in the address bar. The default IP address for most G wireless routers is 192.168.0.1 or 192.168.1.1. Log in to the router using the default admin credentials (usually found in the user manual or on the underside of the router).
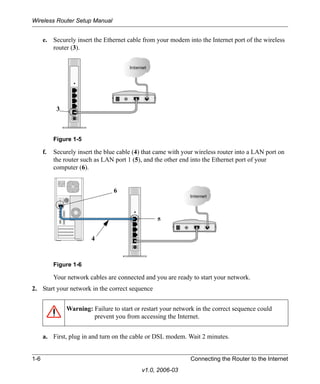
connecting the modem and router
Locate the modem and connect it to the router using an Ethernet cable. Connect the modem to the cable/DSL port on the router, and then connect the cables to the modem and computer respectively.
Configure the settings for your broadband internet service by entering the modem login credentials. Follow the on-screen instructions to complete the modem configuration.
Wireless Network Settings
Configure the wireless settings by following these steps:
- Access the wireless settings page
- Change the default wireless network name (SSID)
- Set a unique password or passphrase for your wireless network
- Set the wireless channel to an open channel
- Save the changes and restart the router
Setting up WEP or WPA Encryption
Next, set up the security settings for your wireless network by choosing between WEP or WPA encryption. WPA encryption is more secure than WEP, but both options are acceptable. You can follow the instructions in the user manual to set up WEP or WPA encryption.
Remember to save the encryption key and password in a safe place for future reference.
Test the Wireless Connection
Once you have completed the wireless settings and encryption setup, test the wireless connection on your computer or device to ensure it's working. Try connecting to your wireless network and verify that you can access the internet.
Final Steps
After completing the setup process, make sure to:
- Save all the settings
- Restart the router
- Check for firmware updates
- Monitor your network and adjust settings as needed
With these step-by-step instructions, you have successfully set up your G wireless router. Remember to configure your network settings securely to prevent unauthorized access. This comprehensive guide covers all the necessary steps to ensure a strong and secure wireless network. Always refer to the user manual for any specific instructions, and consult the manufacturer's support page if you have any issues during the setup process.


![[Wireless Router] How do I enter my ASUS router's setting page using ...](https://image.slidesharecdn.com/wireless-router-setup-manual854-140212233853-phpapp01/85/Wireless-router-setup-manual-24-320.jpg "[Wireless Router] How do I enter my ASUS router's setting page using ...")

