GHZ Router DHCP Server Configuration: A Comprehensive Guide
In today's digital age, having a stable and efficient network is crucial for both personal and professional settings. One of the key components of a stable network is the Dynamic Host Configuration Protocol (DHCP) server. In this article, we will delve into the world of GHZ router DHCP server configuration, understanding its significance, and exploring the steps necessary to configure it effectively.
Understanding DHCP
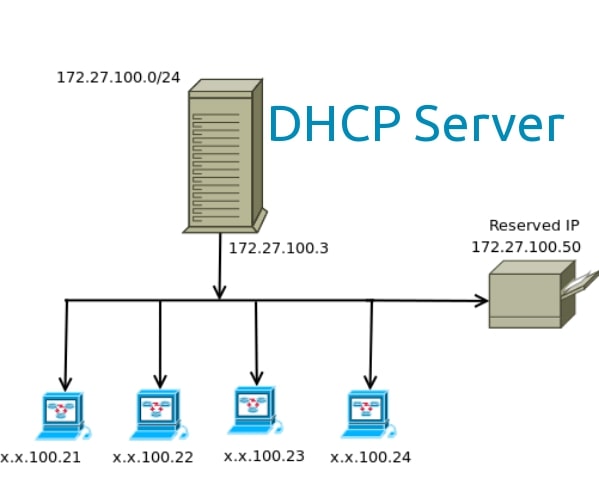
Dynamic Host Configuration Protocol (DHCP) is a protocol that enables automatic assignment of IP addresses and network configuration parameters to devices when they connect to a network. This protocol is essential for automating the process of assigning IP addresses to devices, eliminating the need for manual configuration.
Why Configure DHCP on a Router?
Configuring DHCP on a router has numerous benefits, including reduced configuration errors, improved security, and reduced administrative burdens. When a device connects to a network, the DHCP server assigns a unique IP address to the device, eliminating the possibility of IP address conflicts. Additionally, using a DHCP server improves security by limiting the ability of devices to communicate with one another on the network.
GHZ Router DHCP Server Configuration Steps
Step 1: Access the Router's DHCP Settings
To start configuring the DHCP server, you need to access the router's web-based interface. This can typically be done by typing the router's IP address in the web browser and logging in using the administrator credentials.
Step 2: Configure the IP Address Range
In the DHCP settings, look for the option to configure the IP address range. Specify the range of IP addresses you want to assign to the devices. For example, you can set the range from 192.168.1.100 to 192.168.1.200. Save your changes and restart the router if necessary.
Step 3: Configure the DHCP Lease Time
DHCP lease time determines how long a device retains its assigned IP address. You can configure the lease time by entering a specific duration or setting it to a specific number of days. A shorter lease time may be preferred in environments where devices frequently connect and disconnect.
Step 4: Configure the DHCP Server Options
Configure the DHCP server options, including the subnet mask, default gateway, and DNS server addresses. These options enable devices to access the internet and communicate with other devices on the network.
Additional DHCP Server Configuration Options
- IP Address Pool: This option allows you to specify the range of IP addresses to be assigned to devices.
- subnet mask: This option determines the subnet mask for the assigned IP addresses.
- default gateway: This option specifies the IP address of the default gateway.
- DNS server addresses: This option enables devices to access the internet and communicate with other devices on the network.
- DHCP lease time: This option determines how long a device retains its assigned IP address.
Benefits of Configuring a DHCP Server on a GHZ Router
Configuring a DHCP server on a GHZ router offers numerous benefits, including reduced configuration errors, improved security, and reduced administrative burdens. By following the steps outlined in this article, you can configure a DHCP server on your GHZ router and enjoy the benefits of automatic IP address assignment and network configuration.
Troubleshooting Common DHCP Server Configuration Issues
When configuring a DHCP server on a GHZ router, you may encounter common issues such as IP address conflicts, DHCP lease time expiration, and incorrect subnet mask configuration. By understanding these common issues and taking steps to troubleshoot and resolve them, you can ensure a stable and efficient network.
Conclusion
In conclusion, configuring a DHCP server on a GHZ router is a crucial step in establishing a stable and efficient network. By following the steps outlined in this article, you can configure a DHCP server on your router and enjoy the benefits of automatic IP address assignment and network configuration.


 - GeeksforGeeks")


![How to Bridge a Router [Step by Step Guide] - TechYorker](https://www.boardinfinity.com/blog/content/images/2023/05/DHCP-protocol.png "How to Bridge a Router [Step by Step Guide] - TechYorker")