GHz Router DNS Server Configuration: A Comprehensive Guide
Domain Name System (DNS) is a crucial component of your internet experience, ensuring that you can access websites and online resources seamlessly. However, configuring DNS settings on your GHz router can be a daunting task, especially if you're new to networking. In this article, we'll provide you with a step-by-step guide on how to configure DNS settings on your GHz router, ensuring a faster and more secure browsing experience.
Understanding DNS Server Configuration
Before we dive into the configuration process, it's essential to understand what DNS servers are and how they work. DNS servers translate domain names into IP addresses, allowing your devices to communicate and access the internet. Most ISPs automatically assign DNS server addresses to your router. However, you can manually assign static DNS server addresses if your device requires specific ones.
Why Configure DNS Server Settings on Your Router?
Configuring DNS server settings on your GHz router offers several benefits, including:
- Improved browsing speeds: By using faster and more reliable DNS servers, you can reduce latency and improve your overall browsing experience.
- Increased security: Configuring DNS server settings can help prevent domain name system (DNS) hijacking, which can redirect you to malicious websites or steal your private data.
- Enhanced network security: By configuring DNS filter settings, you can block access to malicious websites and protect your network from external threats.
How to Configure DNS Server Settings on Your GHz Router
Step 1: Access Your Router's Web Interface
To configure DNS server settings, you'll need to access your router's web interface. This is usually done by entering the router's IP address into a web browser (usually 192.168.0.1 or 192.168.1.1). You'll need to enter your administrator credentials to access the web interface.
Step 2: Navigate to the DNS Settings Page
Once you've accessed the web interface, navigate to the DNS settings page. This is usually found under the Advanced Setup or Networking section.
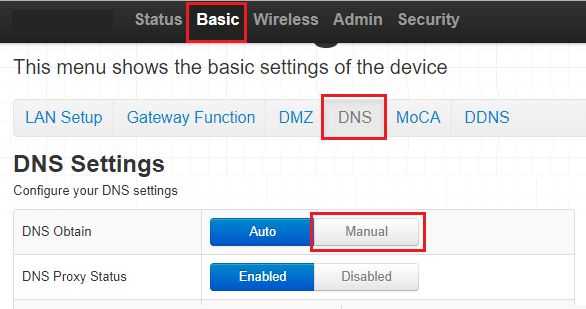
Step 3: Configure the Primary and Secondary DNS Servers
On the DNS settings page, you'll see options to configure the primary and secondary DNS servers. Select the DNS servers you want to use, and enter the IP addresses in the designated fields. Make sure to use the following formats:
- Primary DNS server:
8.8.8.8or1.1.1.1 - Secondary DNS server:
8.8.4.4or1.0.0.1
Step 4: Save and Apply the Changes
Once you've configured the DNS server settings, save and apply the changes. This may require you to restart your router or refresh your browser.
Additional Tips and Considerations
When configuring DNS server settings on your GHz router, keep the following tips and considerations in mind:
- Use a reliable DNS server: Choose a reputable DNS service, such as Google Public DNS or Cloudflare DNS.
- Enable DNS caching: Some DNS servers offer caching, which can improve performance by storing frequently accessed DNS records.
- Monitor your DNS server settings: Regularly check your DNS server settings to ensure they're correctly configured and up-to-date.
Conclusion
Configuring DNS server settings on your GHz router is a straightforward process that can significantly improve your browsing experience. By following the steps outlined in this article, you can ensure a faster and more secure connection to the internet. Remember to choose a reliable DNS server, enable DNS caching, and monitor your DNS server settings for optimal performance.


![[Wireless Router] How to manually assign WAN DNS server to ASUS router?](https://4sysops.com/wp-content/uploads/2019/05/DNS-Servers.png "[Wireless Router] How to manually assign WAN DNS server to ASUS router?")


![Fix: DNS Server Not Responding in Windows 10 [WiFi Issue]](https://windowsbulletin.com/wp-content/uploads/2019/02/Google-Public-DNS.png "Fix: DNS Server Not Responding in Windows 10 [WiFi Issue]")


 - GeeksforGeeks")
