Linksys G Router Configuration: A Comprehensive Guide
The Linksys G router is a popular choice for home and office networks, offering a reliable and high-speed connection to the internet. With its user-friendly interface and advanced features, configuring the Linksys G router is a straightforward process. In this article, we will walk you through the step-by-step process of configuring your Linksys G router for optimal performance.
Before You Begin
Before you start configuring your Linksys G router, make sure you have the following:
- The Linksys G router itself
- A computer or laptop with an Ethernet cable
- The router's power cord
- The router's documentation and user manual
Step 1: Connect to the Router
To connect to the router, follow these steps:
- Connect the power cord to the router and plug it into a power outlet.
- Connect the Ethernet cable to the router's Ethernet port and the other end to your computer's Ethernet port.
- Wait for the router to boot up and the lights to stabilize.
- Open a web browser on your computer and type the router's IP address in the address bar (usually 192.168.1.1 or 192.168.0.1).
- Press Enter to access the router's login page.
Step 2: Login to the Router
To login to the router, follow these steps:
- Type the router's admin username and password in the login page.
- Click on the login button to access the router's web interface.
Step 3: Change the Admin Password
To change the admin password, follow these steps:
- Click on the Admin Password option in the router's web interface.
- Enter a new password and confirm it.
- Click on the Save Changes button to update the password.
Step 4: Configure the Wireless Settings
To configure the wireless settings, follow these steps:
- Click on the Wireless Settings option in the router's web interface.
- Change the wireless network name (SSID) to a unique name.
- Change the wireless channel to a non-overlapping channel.
- Set the wireless encryption to WPA2 or WPA/WPA2.
- Enter a strong password for the wireless network.
- Click on the Save Changes button to update the wireless settings.
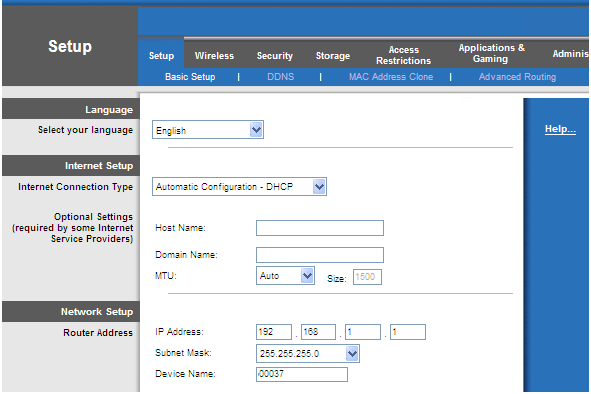
Step 5: Configure the LAN Settings
To configure the LAN settings, follow these steps:
- Click on the LAN Settings option in the router's web interface.
- Change the IP address of the router to a static IP address.
- Set the subnet mask and default gateway to the recommended settings.
- Click on the Save Changes button to update the LAN settings.
Step 6: Save the Changes
To save the changes, follow these steps:
- Click on the Save Changes button to update the router's settings.
- Wait for the router to apply the changes.
- Verify that the changes have been applied by checking the router's lights and the wireless network's status.
Conclusion
Configuring the Linksys G router is a straightforward process that requires a few minutes of your time. By following these steps, you can set up your router for optimal performance and ensure a secure and reliable connection to the internet. Remember to change the admin password and wireless settings to secure your network. If you encounter any issues during the configuration process, refer to the router's documentation and user manual for assistance.
Additional Resources
For more information on configuring the Linksys G router, refer to the following resources:
- The Linksys G router's user manual
- The Linksys website (support.linksys.com)
- The Linksys app (available for iOS and Android devices)


