Home Network Setup with Router and Modem: A Comprehensive Guide
Setting up a home network with a router and modem can be a daunting task, especially for those who are new to the world of networking. However, with the right guidance, you can create a seamless and secure network that meets all your internet needs. In this article, we will take you through the step-by-step process of setting up a home network with a router and modem, and provide you with tips and tricks to ensure a smooth and hassle-free experience.
Understanding the Components
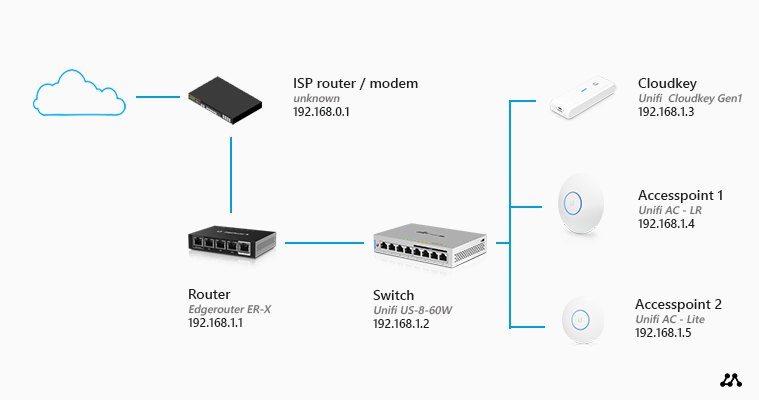
Before we dive into the setup process, let's first understand the components involved. A router is the central component of your home network, responsible for distributing your internet connection to multiple devices at once. A modem, on the other hand, connects your home network to the internet, using a combination of cable, fiber, or DSL technologies. In this article, we will focus on the setup process for a home network with a router and modem.
Step 1: Connect the Modem to the Router
The first step in setting up a home network with a router and modem is to connect the modem to the router. This is typically done using an Ethernet cable, which connects the modem's internet port to the router's WAN port. Make sure to connect the cable securely to both devices, as a loose connection can cause connectivity issues.
- Connect the modem to a power source and turn it on.
- Connect the modem's internet port to the router's WAN port using an Ethernet cable.
- Power on the router and wait for it to boot up.
Step 2: Connect the Router to Your Devices
Once the router is connected to the modem, it's time to connect it to your devices. This can be done using Ethernet cables or wirelessly, depending on the capabilities of your router. Make sure to connect the cables securely to both the router and your devices, as a loose connection can cause connectivity issues.
- Connect a computer directly to one of the router's LAN ports using an Ethernet cable.
- Connect other devices, such as smartphones and smart TVs, wirelessly to the router.
Step 3: Configure the Router
After connecting the router to your devices, it's time to configure it. This can be done by accessing the router's web interface, typically using a web browser. You will need to enter the default username and password provided by the router's manufacturer, and then update the router's firmware and configure the wireless settings, including the network name (SSID) and password.
- Open the router's web interface in a web browser.
- Enter the default username and password provided by the router's manufacturer.
- Update the router's firmware and configure the wireless settings.
Step 4: Secure Your Network
Once the router is configured, it's essential to secure your network to prevent unauthorized access. This can be done by setting up a strong password, enabling WPA3 encryption, and configuring the firewall to block incoming traffic.
- Set up a strong password for your network.
- Enable WPA3 encryption to secure your wireless connection.
- Configure the firewall to block incoming traffic.
Conclusion
Setting up a home network with a router and modem can be a complex process, but with the right guidance, you can create a seamless and secure network that meets all your internet needs. By following the steps outlined in this article, you can connect your devices, configure your router, and secure your network. Remember to always follow the manufacturer's instructions and take the necessary precautions to ensure a smooth and hassle-free experience.
Additional Tips and Tricks
Here are some additional tips and tricks to help you optimize your home network:

 - wikiHow")


